机器学习基础

..

数据分析

数据分析流程

  • 业务调研
  • 明确目标
  • 数据准备:数据抽取、数据清洗转换、数据加载
  • 特征处理
    • 特征向量化。数值特征、类别、文本、统计
    • 文本特征处理:分词(Tokenization)、去停用词(StopWordsRemover)、词稀疏编码(StringIndexer)
    • 特征预处理:特征归一化(StandardScaler、MinMaxScaler、MaxAbsScaler)、正则化(Normalizer)、二值化(Binarizer)
  • 模型训练与评估
  • 输出结论

数据分析基本方法

  • 汇总统计
  • 相关性分析
    • Pearson
    • Spearman
  • 分层抽样
  • 假设检验:皮尔森卡方检验 chiSqTest
1
2
3
4
5
6
7
8
9
10
11
12
13
14
15
16
17
18
19
20
21
22
23
24
25
26
27
28
29
30
31
32
33
34
35
36
37
38
39
40
41
42
43
44
45
46
47
48
49
50
51
52
53
54
55
* download url: https://snap.stanford.edu/data/loc-gowalla.html
* format: [user] [check-in time] [latitude] [longitude] [location id]
* 4913 2009-12-13T18:01:14Z 41.9759716333 -87.90606665 165768
* 4913 2009-12-13T18:01:02Z 41.97656125 -87.9064951333 49205
*/
// 定义数据类
case class CheckIn(user: String, time: String, latitude: Double, longitude: Double, location: String)

// 创建实例
object GowallaDatasetExploration {

def main(args: Array[String]) {
Logger.getLogger("org.apache.spark").setLevel(Level.WARN)

//2rd_data/ch02/Gowalla_totalCheckins.txt output/ch02 local[2]
val Array(input,output,mode) = args
val conf = new SparkConf().setAppName(this.getClass.getSimpleName).setMaster(mode)
val sc = new SparkContext(conf)
//返回一个RDD
val gowalla = sc.textFile(input).map(_.split("\t")).mapPartitions{
case iter => //匿名函数
val format = DateTimeFormat.forPattern("yyyy-MM-dd\'T\'HH:mm:ss\'Z\'")
iter.map{
//DateTime.parse(terms(1),format)
case terms => CheckIn(terms(0),terms(1).substring(0,10),terms(2).toDouble,terms(3).toDouble,terms(4))
}
}
// user, checkins, check in days, locations将数据转换成向量形式
val data = gowalla.map{
case check: CheckIn => (check.user, (1L, Set(check.time), Set(check.location))) // Set(集合)是没有重复的对象集合,所有的元素都是唯一的。
}.reduceByKey {
// 并集 union
case (left, right) => (left._1 + right._1, left._2.union(right._2),left._3.union(right._3))
}.map {
case (user, (checkins, days:Set[String], locations:Set[String])) =>
Vectors.dense(checkins.toDouble, days.size.toDouble, locations.size.toDouble)
}
//保存
data.coalesce(1).saveAsTextFile(output)

//统计方法
val summary: MultivariateStatisticalSummary = Statistics.colStats(data)
//均值
println("Mean"+summary.mean)
//方差
println("Variance"+summary.variance)
//非零元素的目录
println("NumNonzeros"+summary.numNonzeros)
//皮尔逊
val correlMatrix: Matrix = Statistics.corr(data, "pearson")
println("correlMatrix"+correlMatrix.toString)

sc.stop()
}
}

一层神经元的Cifar二分类

将反向传播的
https://www.cnblogs.com/charlotte77/p/5629865.html

1
2
3
4
5
6
7
8
9
10
11
12
13
14
15
16
17
18
19
20
21
22
23
24
25
26
27
28
29
30
31
32
33
34
35
36
37
38
39
40
41
42
43
44
45
46
47
48
49
50
51
52
53
54
55
56
57
58
59
60
61
62
63
64
65
66
67
68
69
70
71
72
73
74
75
76
77
78
79
80
81
82
83
84
85
86
87
88
89
90
91
92
93
94
95
96
97
98
99
100
101
102
103
104
105
106
107
108
109
110
111
import pickle
import numpy as np
import os
import tensorflow as tf

import matplotlib.pyplot as plt
from matplotlib.pyplot import imshow
CIFAR_DIR = "cifar-10-batches-py" print(os.listdir(CIFAR_DIR))

""" with open(os.path.join(CIFAR_DIR, "data_batch_1"), 'rb') as f:
data = pickle.load(f, encoding='bytes') print(type(data)) print(data.keys()) print(type(data[b'data'])) print(type(data[b'labels'])) print(type(data[b'batch_label'])) print(type(data[b'filenames'])) print(data[b'data'].shape) print(data[b'data'][0:2]) print(data[b'labels'][0:2]) print(data[b'batch_label']) print(data[b'filenames'][0:2]) # 32 * 32 = 1024 * 3 = 3072 # RR-GG-BB = 3072 """ def load_data(filename):
"""read data from data file."""
with open(filename, 'rb') as f:
# 反序列化对象,将文件中的数据解析为一个python对象。dump是序列化
data = pickle.load(f, encoding='bytes')
return data[b'data'], data[b'labels']

# tensorflow.Dataset. class CifarData:
def __init__(self, filenames, need_shuffle):
all_data = []
all_labels = []
for filename in filenames:
data, labels = load_data(filename)# 针对一个文件做处理
for item, label in zip(data, labels):
if label in [0, 1]:
all_data.append(item)
all_labels.append(label)
self._data = np.vstack(all_data)# 纵向合并为矩阵
self._data = self._data / 127.5 - 1
self._labels = np.hstack(all_labels)# 横向合为矩阵---一维向量
print(self._data.shape)
print(self._labels.shape)

self._num_examples = self._data.shape[0]
self._need_shuffle = need_shuffle
self._indicator = 0
if self._need_shuffle:
self._shuffle_data()

def _shuffle_data(self):
# [0,1,2,3,4,5] -> [5,3,2,4,0,1]
p = np.random.permutation(self._num_examples)
self._data = self._data[p]
self._labels = self._labels[p]

def next_batch(self, batch_size):
"""return batch_size examples as a batch."""
end_indicator = self._indicator + batch_size
if end_indicator > self._num_examples:
if self._need_shuffle:
self._shuffle_data()
self._indicator = 0
end_indicator = batch_size
else:
raise Exception("have no more examples")
if end_indicator > self._num_examples:
raise Exception("batch size is larger than all examples")
# 找到了合适的数据
batch_data = self._data[self._indicator: end_indicator]
batch_labels = self._labels[self._indicator: end_indicator]
self._indicator = end_indicator
return batch_data, batch_labels

# 路径拼接 自动加 train_filenames = [os.path.join(CIFAR_DIR, 'data_batch_%d' % i) for i in range(1, 6)]
test_filenames = [os.path.join(CIFAR_DIR, 'test_batch')]

train_data = CifarData(train_filenames, True)
test_data = CifarData(test_filenames, False)

# 搭建计算图 # placeholder先占位,等有数据来的时候再填充 32*32 data x = tf.placeholder(tf.float32, [None, 3072])
# [None]代表输入的样本数目是不确定的 lable y = tf.placeholder(tf.int64, [None])

# (3072, 1) 用正态分布做初始化,“w”意思是如果已经定义,就使用,没定义就定义一个新的 w = tf.get_variable('w', [x.get_shape()[-1], 1], initializer=tf.random_normal_initializer(0, 1))
# (1, ) b = tf.get_variable('b', [1], initializer=tf.constant_initializer(0.0))

# 矩阵乘法 [None, 3072] * [3072, 1] = [None, 1] y_ = tf.matmul(x, w) + b

# [None, 1] 逻辑斯蒂回归,把内积变为概率 p_y_1 = tf.nn.sigmoid(y_)
# [None, 1] 把y的shape转换为与py_1一样 y_reshaped = tf.reshape(y, (-1, 1))
# int64-》float32 y_reshaped_float = tf.cast(y_reshaped, tf.float32)
loss = tf.reduce_mean(tf.square(y_reshaped_float - p_y_1))

# bool 预测值 predict = p_y_1 > 0.5 # [1,0,1,1,1,0,0,0] 预测对了 correct_prediction = tf.equal(tf.cast(predict, tf.int64), y_reshaped)
accuracy = tf.reduce_mean(tf.cast(correct_prediction, tf.float64))

# 梯度下降方法 范围 with tf.name_scope('train_op'):
# 1e-3是初始学习率,会调整
train_op = tf.train.AdamOptimizer(1e-3).minimize(loss)

init = tf.global_variables_initializer()
batch_size = 20 train_steps = 100000 test_steps = 100 with tf.Session() as sess:
sess.run(init)
for i in range(train_steps):
batch_data, batch_labels = train_data.next_batch(batch_size)
# 返回值是根据填的参数确定的?
loss_val, acc_val, _ = sess.run([loss, accuracy, train_op],
feed_dict={x: batch_data,y: batch_labels})
if (i + 1) % 500 == 0:
print('[Train] Step: %d, loss: %4.5f, acc: %4.5f' % (i + 1, loss_val, acc_val))
if (i + 1) % 5000 == 0:
test_data = CifarData(test_filenames, False)
all_test_acc_val = []
for j in range(test_steps):
test_batch_data, test_batch_labels = test_data.next_batch(batch_size)

test_acc_val = sess.run([accuracy],
feed_dict={x: test_batch_data,y: test_batch_labels})

all_test_acc_val.append(test_acc_val)
test_acc = np.mean(all_test_acc_val)
print('[Test ] Step: %d, acc: %4.5f' % (i + 1, test_acc))

卷积神经网络

最普通的

就计算图变了

1
2
3
4
5
6
7
8
9
10
11
12
13
14
15
16
17
18
19
20
21
22
23
24
25
26
27
28
29
30
31
32
33
34
35
36
37
38
39
40
41
42
43
44
45
46
47
48
49
50
51
52
53
54
55
56
57
58
59
60
61
62

x = tf.placeholder(tf.float32, [None, 3072])
y = tf.placeholder(tf.int64, [None])
# [None], eg: [0,5,6,3] 把一维向量转换为三通道的一个图片形式
x_image = tf.reshape(x, [-1, 3, 32, 32])
# 32*32 交换通道
x_image = tf.transpose(x_image, perm=[0, 2, 3, 1])

# conv1: 神经元图, feature_map, 输出图像
conv1 = tf.layers.conv2d(x_image,
32, # output channel number
(3,3), # kernel size
padding = 'same',
activation = tf.nn.relu,
name = 'conv1')

# 图像大小变为16 * 16
pooling1 = tf.layers.max_pooling2d(conv1,
(2, 2), # kernel size
(2, 2), # stride
name = 'pool1')


conv2 = tf.layers.conv2d(pooling1,
32, # output channel number
(3,3), # kernel size
padding = 'same',
activation = tf.nn.relu,
name = 'conv2')

# 8 * 8
pooling2 = tf.layers.max_pooling2d(conv2,
(2, 2), # kernel size
(2, 2), # stride
name = 'pool2')

conv3 = tf.layers.conv2d(pooling2,
32, # output channel number
(3,3), # kernel size
padding = 'same',
activation = tf.nn.relu,
name = 'conv3')

# 4 * 4 * 32
pooling3 = tf.layers.max_pooling2d(conv3,
(2, 2), # kernel size
(2, 2), # stride
name = 'pool3')
# [None, 4 * 4 * 32] 全连接 (扁平化)
flatten = tf.layers.flatten(pooling3)
y_ = tf.layers.dense(flatten, 10)

loss = tf.losses.sparse_softmax_cross_entropy(labels=y, logits=y_)
# y_ -> sofmax
# y -> one_hot
# loss = ylogy_

# indices
predict = tf.argmax(y_, 1)
# [1,0,1,1,1,0,0,0]
correct_prediction = tf.equal(predict, y)
accuracy = tf.reduce_mean(tf.cast(correct_prediction, tf.float64))

VGG

就是多了一些卷积层
视野域

  • 2个33 = 1个55
  • 2层比1层多一次非线性变换
  • 参数降低28%

VGG由5层卷积层、3层全连接层、softmax输出层构成,层与层之间使用max-pooling(最大化池)分开,所有隐层的激活单元都采用ReLU函数。

1、结构简洁
VGG由5层卷积层、3层全连接层、softmax输出层构成,层与层之间使用max-pooling(最大化池)分开,所有隐层的激活单元都采用ReLU函数。
2、小卷积核和多卷积子层
VGG使用多个较小卷积核(3x3)的卷积层代替一个卷积核较大的卷积层,一方面可以减少参数,另一方面相当于进行了更多的非线性映射,可以增加网络的拟合/表达能力。
小卷积核是VGG的一个重要特点,虽然VGG是在模仿AlexNet的网络结构,但没有采用AlexNet中比较大的卷积核尺寸(如7x7),而是通过降低卷积核的大小(3x3),增加卷积子层数来达到同样的性能(VGG:从1到4卷积子层,AlexNet:1子层)。
VGG的作者认为两个3x3的卷积堆叠获得的感受野大小,相当一个5x5的卷积;而3个3x3卷积的堆叠获取到的感受野相当于一个7x7的卷积。这样可以增加非线性映射,也能很好地减少参数(例如7x7的参数为49个,而3个3x3的参数为27)
3、小池化核
相比AlexNet的3x3的池化核,VGG全部采用2x2的池化核。
4、通道数多
VGG网络第一层的通道数为64,后面每层都进行了翻倍,最多到512个通道,通道数的增加,使得更多的信息可以被提取出来。
5、层数更深、特征图更宽
由于卷积核专注于扩大通道数、池化专注于缩小宽和高,使得模型架构上更深更宽的同时,控制了计算量的增加规模。
6、全连接转卷积(测试阶段)
这也是VGG的一个特点,在网络测试阶段将训练阶段的三个全连接替换为三个卷积,使得测试得到的全卷积网络因为没有全连接的限制,因而可以接收任意宽或高为的输入,这在测试阶段很重要。

1
2
3
4
5
6
7
8
9
10
11
12
13
14
15
16
17
18
19
20
21
22
23
24
25
26
27
28
29
30
31
32
33
34
35
36
37
38
39
40
41
42
43
44
45
46
47
48
49
50
51
52
53
54
55
56
57
58
59
60
61
62
63
64
65
66
67
68
69
70
71
72
73
74
75
76
77
78
79
80
x = tf.placeholder(tf.float32, [None, 3072])
y = tf.placeholder(tf.int64, [None])
# [None], eg: [0,5,6,3]
x_image = tf.reshape(x, [-1, 3, 32, 32])
# 32*32
x_image = tf.transpose(x_image, perm=[0, 2, 3, 1])

# conv1: 神经元图, feature_map, 输出图像
conv1_1 = tf.layers.conv2d(x_image,
32, # output channel number
(3,3), # kernel size
padding = 'same',
activation = tf.nn.relu,
name = 'conv1_1')
conv1_2 = tf.layers.conv2d(conv1_1,
32, # output channel number
(3,3), # kernel size
padding = 'same',
activation = tf.nn.relu,
name = 'conv1_2')

# 16 * 16
pooling1 = tf.layers.max_pooling2d(conv1_2,
(2, 2), # kernel size
(2, 2), # stride
name = 'pool1')


conv2_1 = tf.layers.conv2d(pooling1,
32, # output channel number
(3,3), # kernel size
padding = 'same',
activation = tf.nn.relu,
name = 'conv2_1')
conv2_2 = tf.layers.conv2d(conv2_1,
32, # output channel number
(3,3), # kernel size
padding = 'same',
activation = tf.nn.relu,
name = 'conv2_2')
# 8 * 8
pooling2 = tf.layers.max_pooling2d(conv2_2,
(2, 2), # kernel size
(2, 2), # stride
name = 'pool2')

conv3_1 = tf.layers.conv2d(pooling2,
32, # output channel number
(3,3), # kernel size
padding = 'same',
activation = tf.nn.relu,
name = 'conv3_1')
conv3_2 = tf.layers.conv2d(conv3_1,
32, # output channel number
(3,3), # kernel size
padding = 'same',
activation = tf.nn.relu,
name = 'conv3_2')
# 4 * 4 * 32
pooling3 = tf.layers.max_pooling2d(conv3_2,
(2, 2), # kernel size
(2, 2), # stride
name = 'pool3')
# [None, 4 * 4 * 32]
flatten = tf.layers.flatten(pooling3)
y_ = tf.layers.dense(flatten, 10)

loss = tf.losses.sparse_softmax_cross_entropy(labels=y, logits=y_)
# y_ -> sofmax
# y -> one_hot
# loss = ylogy_

# indices
predict = tf.argmax(y_, 1)
# [1,0,1,1,1,0,0,0]
correct_prediction = tf.equal(predict, y)
accuracy = tf.reduce_mean(tf.cast(correct_prediction, tf.float64))

with tf.name_scope('train_op'):
train_op = tf.train.AdamOptimizer(1e-3).minimize(loss)

ResNet

假设现有一个比较浅的网络(Shallow Net)已达到了饱和的准确率,这时在它后面再加上几个恒等映射层(Identity mapping,也即y=x,输出等于输入),这样就增加了网络的深度,并且起码误差不会增加,也即更深的网络不应该带来训练集上误差的上升。而这里提到的使用恒等映射直接将前一层输出传到后面的思想,便是著名深度残差网络ResNet的灵感来源。

这种残差跳跃式的结构,打破了传统的神经网络n-1层的输出只能给n层作为输入的惯例,使某一层的输出可以直接跨过几层作为后面某一层的输入,其意义在于为叠加多层网络而使得整个学习模型的错误率不降反升的难题提供了新的方向。

1
2
3
4
5
6
7
8
9
10
11
12
13
14
15
16
17
18
19
20
21
22
23
24
25
26
27
28
29
30
31
32
33
34
35
36
37
38
39
40
41
42
43
44
45
46
47
48
49
50
51
52
53
54
55
56
57
58
59
60
61
62
63
64
65
66
67
68
69
70
71
72
73
74
75
76
77
78
79
80
81
82
83
84
85
86
87
88
89
90
91
92
93
94
95
96
97
98
99
100
101
102
103
104
105
106
107
108
109
def residual_block(x, output_channel): # 输出通道数翻倍 
"""residual connection implementation"""
input_channel = x.get_shape().as_list()[-1] # x的最后一维
if input_channel * 2 == output_channel:
increase_dim = True
strides = (2, 2)
elif input_channel == output_channel:
increase_dim = False
strides = (1, 1)
else:
raise Exception("input channel can't match output channel")
conv1 = tf.layers.conv2d(x,
output_channel,
(3,3), # 卷积核
strides = strides,
padding = 'same',
activation = tf.nn.relu,
name = 'conv1')
conv2 = tf.layers.conv2d(conv1,
output_channel,
(3, 3),
strides = (1, 1),
padding = 'same',
activation = tf.nn.relu,
name = 'conv2')
if increase_dim:
# [None, image_width, image_height, channel] -> [,,,channel*2]
pooled_x = tf.layers.average_pooling2d(x,
(2, 2),
(2, 2),
padding = 'valid')
padded_x = tf.pad(pooled_x,
[[0,0], # 三个维度都是补充0行0列
[0,0],
[0,0],
[input_channel // 2, input_channel // 2]])
else:
padded_x = x
output_x = conv2 + padded_x
return output_x

def res_net(x,
num_residual_blocks,
num_filter_base,
class_num):
"""residual network implementation"""
"""
Args:
- x:
- num_residual_blocks: eg: [3, 4, 6, 3]
- num_filter_base:
- class_num:
"""
num_subsampling = len(num_residual_blocks)
layers = []
# x: [None, width, height, channel] -> [width, height, channel]
input_size = x.get_shape().as_list()[1:]
with tf.variable_scope('conv0'):
conv0 = tf.layers.conv2d(x,
num_filter_base,
(3, 3),
strides = (1, 1),
padding = 'same',
activation = tf.nn.relu,
name = 'conv0')
layers.append(conv0)
# eg:num_subsampling = 4, sample_id = [0,1,2,3]
for sample_id in range(num_subsampling):
for i in range(num_residual_blocks[sample_id]):
with tf.variable_scope("conv%d_%d" % (sample_id, i)):
conv = residual_block(
layers[-1],
num_filter_base * (2 ** sample_id))
layers.append(conv)
multiplier = 2 ** (num_subsampling - 1)
assert layers[-1].get_shape().as_list()[1:] \
== [input_size[0] / multiplier,
input_size[1] / multiplier,
num_filter_base * multiplier]
with tf.variable_scope('fc'):
# layer[-1].shape : [None, width, height, channel]
# kernal_size: image_width, image_height
global_pool = tf.reduce_mean(layers[-1], [1,2])
logits = tf.layers.dense(global_pool, class_num)
layers.append(logits)
return layers[-1]

x = tf.placeholder(tf.float32, [None, 3072])
y = tf.placeholder(tf.int64, [None])
# [None], eg: [0,5,6,3]
x_image = tf.reshape(x, [-1, 3, 32, 32])
# 32*32
x_image = tf.transpose(x_image, perm=[0, 2, 3, 1])

y_ = res_net(x_image, [2,3,2], 32, 10)

loss = tf.losses.sparse_softmax_cross_entropy(labels=y, logits=y_)
# y_ -> sofmax
# y -> one_hot
# loss = ylogy_

# indices
predict = tf.argmax(y_, 1)
# [1,0,1,1,1,0,0,0]
correct_prediction = tf.equal(predict, y)
accuracy = tf.reduce_mean(tf.cast(correct_prediction, tf.float64))

with tf.name_scope('train_op'):
train_op = tf.train.AdamOptimizer(1e-3).minimize(loss)

InceptionNet

分组卷积

(1)参数太多,如果训练数据集有限,很容易产生过拟合;
(2)网络越大、参数越多,计算复杂度越大,难以应用;
(3)网络越深,容易出现梯度弥散问题(梯度越往后穿越容易消失),难以优化模型。

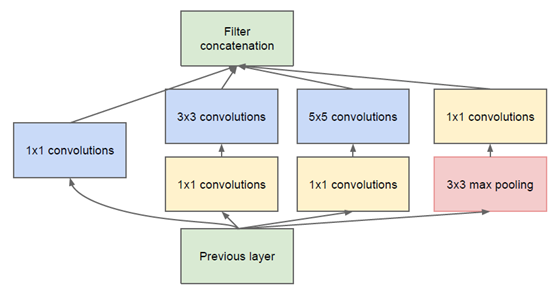
Inception V1
通过设计一个稀疏网络结构,但是能够产生稠密的数据,既能增加神经网络表现,又能保证计算资源的使用效率。
1
2
3
4
5
6
7
8
9
10
11
12
13
14
15
16
17
18
19
20
21
22
23
24
25
26
27
28
29
30
31
32
33
34
35
36
37
38
39
40
41
42
43
44
45
46
47
48
49
50
51
52
53
54
55
56
57
58
59
60
61
62
63
64
65
66
67
68
69
70
71
72
73
74
75
76
77
78
79
80
81
82
83
84
85
86
87
88
89
90
91
92
93
94
95
96
97
98
99
100
101
102
103
104
105
106
107
108
109
110
111
112
def inception_block(x,
output_channel_for_each_path,
name):
"""inception block implementation"""
"""
Args:
- x:
- output_channel_for_each_path: eg: [10, 20, 5]
- name:
"""
with tf.variable_scope(name):
conv1_1 = tf.layers.conv2d(x,
output_channel_for_each_path[0],
(1, 1),# 卷积核
strides = (1,1), # 步长
padding = 'same',
activation = tf.nn.relu,
name = 'conv1_1')
conv3_3 = tf.layers.conv2d(x,
output_channel_for_each_path[1],
(3, 3),
strides = (1,1),
padding = 'same',
activation = tf.nn.relu,
name = 'conv3_3')
conv5_5 = tf.layers.conv2d(x,
output_channel_for_each_path[2],
(5, 5),
strides = (1,1),
padding = 'same',
activation = tf.nn.relu,
name = 'conv5_5')
max_pooling = tf.layers.max_pooling2d(x,
(2, 2),
(2, 2),
name = 'max_pooling')

max_pooling_shape = max_pooling.get_shape().as_list()[1:]
input_shape = x.get_shape().as_list()[1:]
width_padding = (input_shape[0] - max_pooling_shape[0]) // 2
height_padding = (input_shape[1] - max_pooling_shape[1]) // 2
padded_pooling = tf.pad(max_pooling,
[[0, 0],
[width_padding, width_padding],
[height_padding, height_padding],
[0, 0]])
concat_layer = tf.concat(
[conv1_1, conv3_3, conv5_5, padded_pooling],
axis = 3)
return concat_layer

x = tf.placeholder(tf.float32, [None, 3072])
y = tf.placeholder(tf.int64, [None])
# [None], eg: [0,5,6,3]
x_image = tf.reshape(x, [-1, 3, 32, 32])
# 32*32
x_image = tf.transpose(x_image, perm=[0, 2, 3, 1])

# conv1: 神经元图, feature_map, 输出图像
conv1 = tf.layers.conv2d(x_image,
32, # output channel number
(3,3), # kernel size
padding = 'same',
activation = tf.nn.relu,
name = 'conv1')

pooling1 = tf.layers.max_pooling2d(conv1,
(2, 2), # kernel size
(2, 2), # stride
name = 'pool1')

inception_2a = inception_block(pooling1,
[16, 16, 16],
name = 'inception_2a')
inception_2b = inception_block(inception_2a,
[16, 16, 16],
name = 'inception_2b')

pooling2 = tf.layers.max_pooling2d(inception_2b,
(2, 2), # kernel size
(2, 2), # stride
name = 'pool2')

inception_3a = inception_block(pooling2,
[16, 16, 16],
name = 'inception_3a')
inception_3b = inception_block(inception_3a,
[16, 16, 16],
name = 'inception_3b')

pooling3 = tf.layers.max_pooling2d(inception_3b,
(2, 2), # kernel size
(2, 2), # stride
name = 'pool3')


flatten = tf.layers.flatten(pooling3)
y_ = tf.layers.dense(flatten, 10)

loss = tf.losses.sparse_softmax_cross_entropy(labels=y, logits=y_)
# y_ -> sofmax
# y -> one_hot
# loss = ylogy_

# indices
predict = tf.argmax(y_, 1)
# [1,0,1,1,1,0,0,0]
correct_prediction = tf.equal(predict, y)
accuracy = tf.reduce_mean(tf.cast(correct_prediction, tf.float64))

with tf.name_scope('train_op'):
train_op = tf.train.AdamOptimizer(1e-3).minimize(loss)