SpringBoot中搭建全文检索引擎Solr

Solr介绍

Solr 是Apache下的一个顶级开源项目,采用Java开发,它是基于Lucene的全文搜索服务器。Solr可以独立运行在Jetty、Tomcat等这些Servlet容器中。

Solr提供了比Lucene更为丰富的查询语言,同时实现了可配置、可扩展,并对索引、搜索性能进行了优化。

使用Solr 进行创建索引和搜索索引的实现方法很简单,如下:

  • 创建索引:客户端(可以是浏览器可以是Java程序)用 POST 方法向 Solr 服务器发送一个描述 Field 及其内容的 XML 文档,Solr服务器根据xml文档添加、删除、更新索引 。
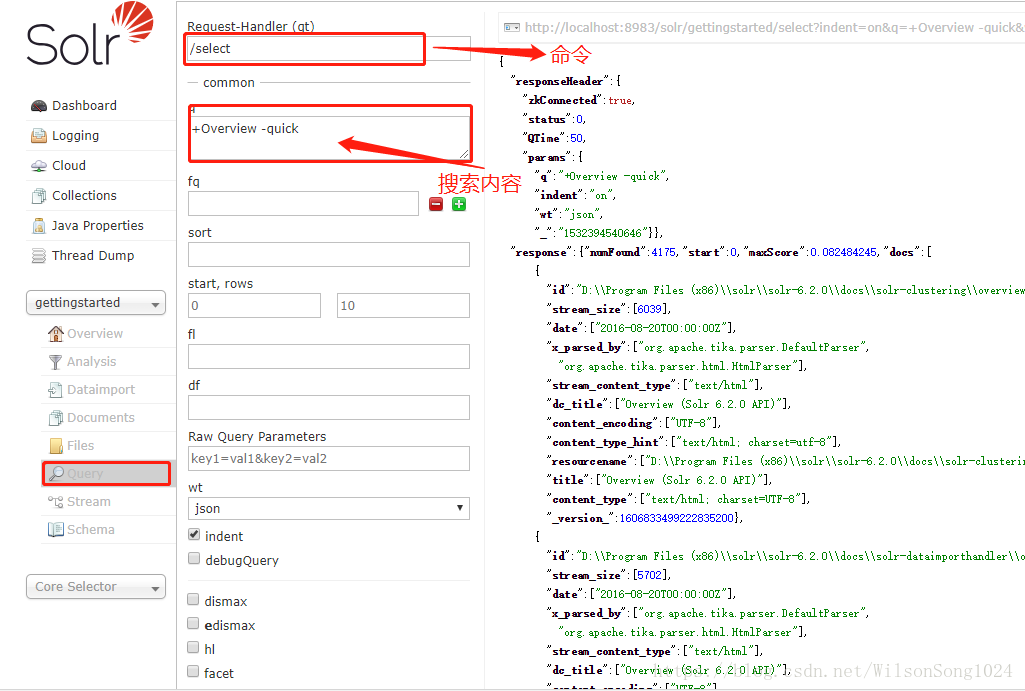
  • 搜索索引:客户端(可以是浏览器可以是Java程序)用 GET方法向 Solr 服务器发送请求,然后对Solr服务器返回Xml、json等格式的查询结果进行解析,组织页面布局。Solr不提供构建页面UI的功能,但是Solr提供了一个管理界面,通过管理界面可以查询Solr的配置和运行情况。

Slor的安装启动

下载地址http://lucene.apache.org/solr/

下载完成后解压即可

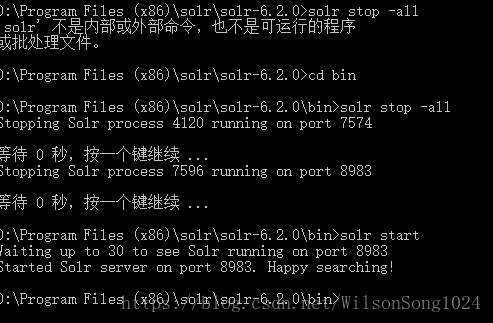
cmd命令行下切换到解压目录下的bin目录下,启动slor服务,启动的是solr的云服务版,启动命令为

solr -e cloud -noprompt
默认在8983和7574端口启动两组solr服务

当然也可以用下述命令启动单机版的solr:

solr start -p 8983
当需要更多的命令时,可以使用

solr -help
查看更多的命令

启动服务之后在http://localhost:8983就可以打开启动的solr服务

image

启动服务之后,需要导入相应的数据,命令为:

1
java -Dc=gettingstarted -Dauto -Drecursive -jar example\exampledocs\post.jar docs\
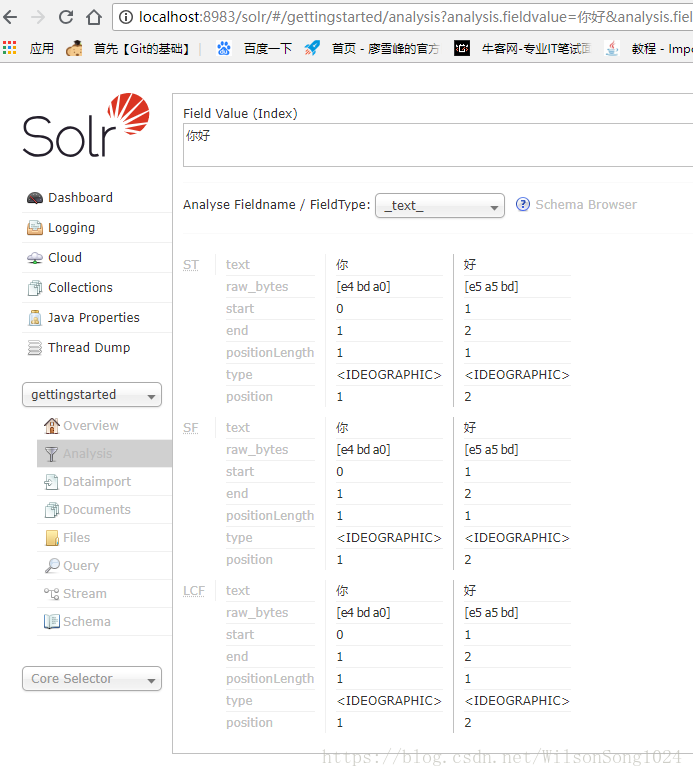
image

中文分词搜索:IK-Analyzer

(1)关掉上述cloud版的服务,然后打开单机版,默认89893端口打开
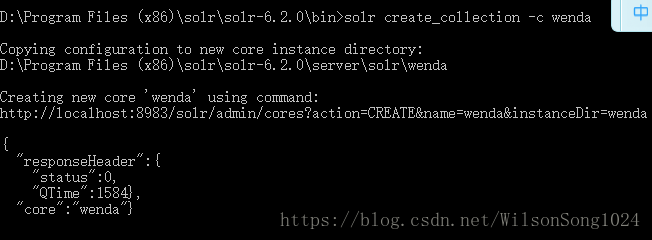
image

(2)创建索引的部署

image

(3)中文分词

由于slor默认的是英文格式的分词格式,也就是按照空格的方式分词的,因此要实现中文的分词需要做一些修改
image

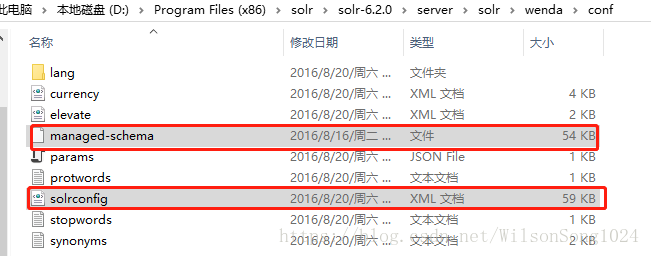
下面两个文件是我们所需要了解的两个配置文件
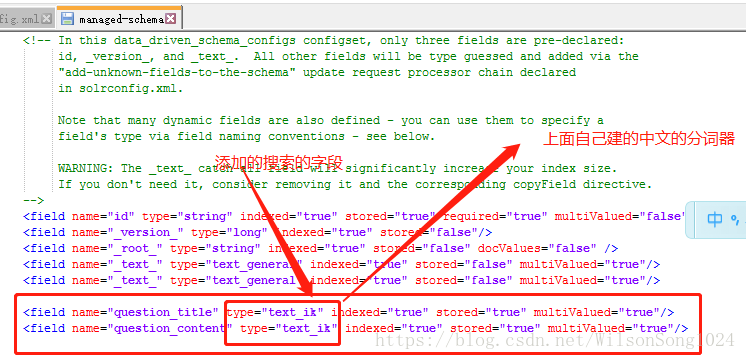
在managed-schema中添加如下代码端作为中文分词的配置

1
2
3
4
5
6
7
8
9
10
11
<fieldTypename="text_ik" class="solr.TextField">
<!--索引时候的分词器-->
<analyzer type="index">
<tokenizerclass="org.wltea.analyzer.util.IKTokenizerFactory" useSmart=“false"/>
<filter class="solr.LowerCaseFilterFactory"/>
</analyzer>
<!--查询时候的分词器-->
<analyzer type="query">
<tokenizerclass="org.wltea.analyzer.util.IKTokenizerFactory" useSmart=“true"/>
</analyzer>
</fieldType>

索引时候的分词器使用的是useSmart=“false”,这个时候分词分的越细越好
查询时候的分词器使用的是useSmart=“true”,这个时候就是越接近查询的内容越好,查询起来越快

image

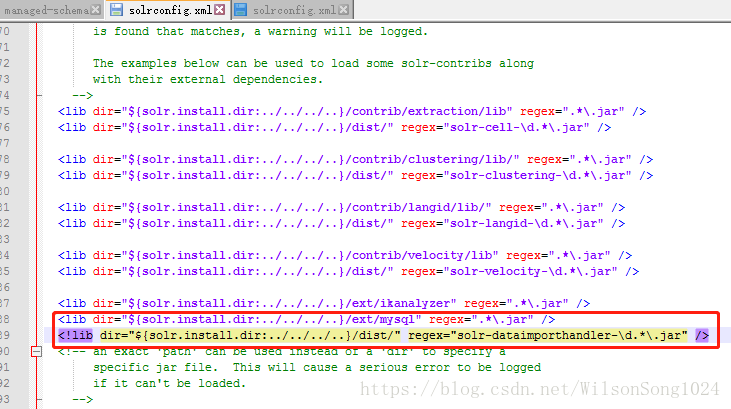
后台的配置因为需要用到中文的分词,所以需要你进行在solrconfig.xml中的lib下添加相应的jar包

image

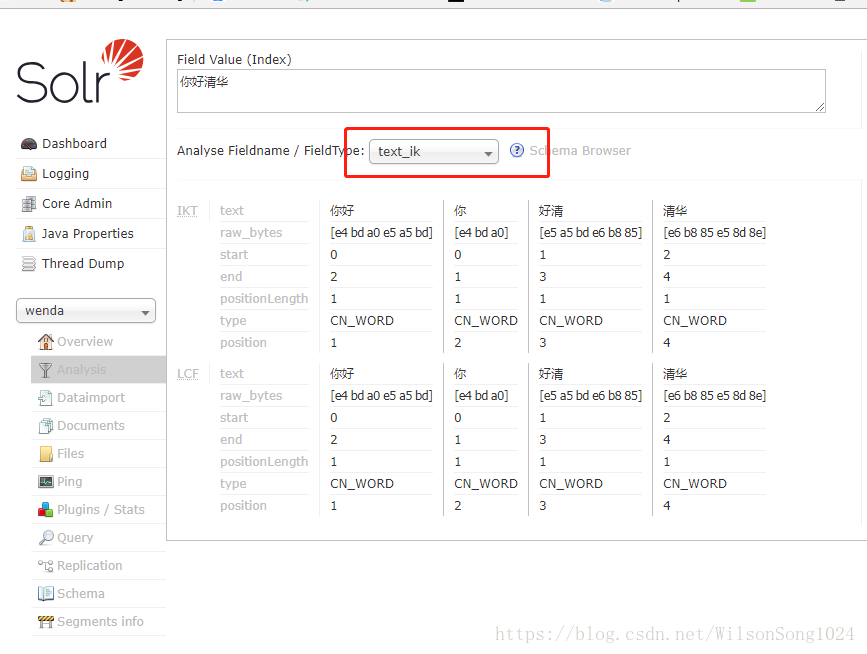
重启solr,在solr中就可以看见相应的text_ik的分词器,就是刚才自己定义的text_ik
使用分词之后可以看到和上述的分词的结果是一样的

image

然后搜索的话需要有字典和后台的数据库的内容,然后如何从数据库中把数据导入呢?

数据库相关jar包导入,参考资料:http://wiki.apache.org/solr/DIHQuickStart

首先在solrconfig.xml中添加如下代码行
image

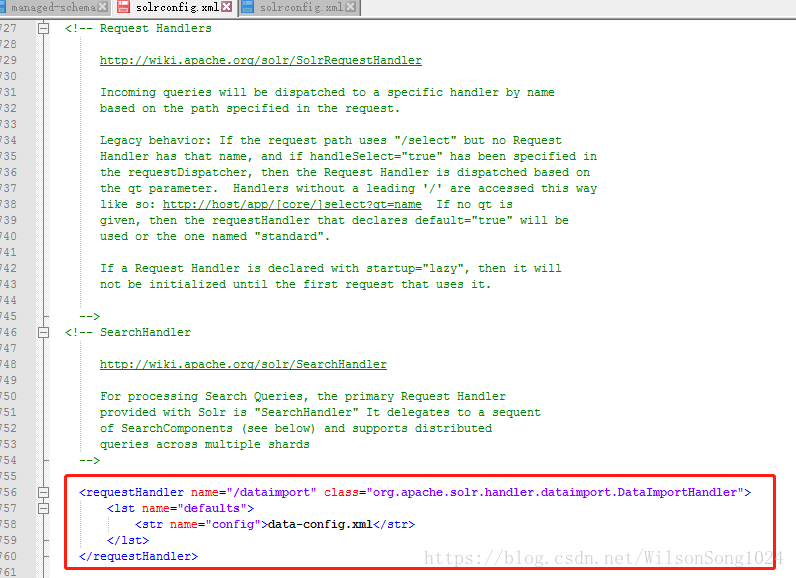
上图中有显示一个data-config.xml的文件,这个是我们需要自己添加并配置的

在你的自己之前建立的wenda的目录文件夹下新建一个data-config.xml,并在文件中添加如下代码段

1
2
3
4
5
6
7
8
9
10
11
12
13
14
<dataConfig>
<dataSource type="JdbcDataSource"
driver="com.mysql.jdbc.Driver"
url="jdbc:mysql://localhost/wenda"
user="root"
password="123456"/>
<document>
<entity name="question"
query="select id,title,content from question">
<field column="title" name="question_title"/>
<field column="content" name="question_content"/>
</entity>
</document>
</dataConfig>

其实上面代码段与你的数据库是一一对应的,这个代码段是在里抄来的,然后根据自己的参数进行修改

url 数据库的本机地址
user 数据库的用户名
password 数据库的密码

与是你数据库的字段,与你的managed-schema中定义的filed的name的定义是相同的
同上

image

然后重启solr

导入数据库里的数据

image

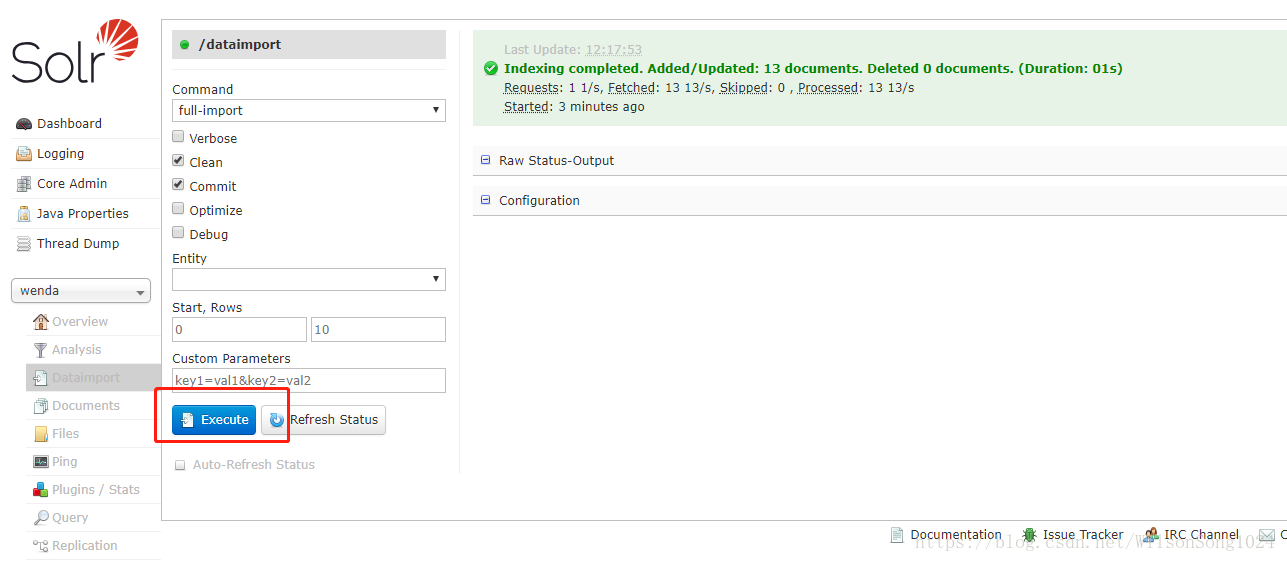
到这里就把solr的服务器搭建并测试成功了

Sringboot中集成solr

(1).pom中添加solrj的Maven依赖

1
2
3
4
5
6
!-- https://mvnrepository.com/artifact/org.apache.solr/solr-solrj -->
<dependency>
<groupId>org.apache.solr</groupId>
<artifactId>solr-solrj</artifactId>
<version>6.2.0</version>
</dependency>

<
(2)按照dao-service-controller编写服务
因为不涉及数据库的读写,所以就不需要dao层

关于solr的集成按照什么方式去配置,怎么去写,参照

service层

1
2
3
4
5
6
7
8
9
10
11
12
13
14
15
16
17
18
19
20
21
22
23
24
25
26
27
28
29
30
31
32
33
34
35
36
37
38
39
40
41
42
43
44
45
46
47
48
49
50
51
52
53
54
55
56
57
58
59
60
61
62
63
64
65
66
67
68
69
70
71
72
73
74
75
76
77
78
79
80
81
82
83
84
85
86
87
88
89
90
91
92
93
package com.springboot.springboot.service;

import com.springboot.springboot.model.Question;
import org.apache.ibatis.annotations.Update;
import org.apache.solr.client.solrj.SolrQuery;
import org.apache.solr.client.solrj.impl.HttpSolrClient;
import org.apache.solr.client.solrj.response.QueryResponse;
import org.apache.solr.client.solrj.response.UpdateResponse;
import org.apache.solr.common.SolrInputDocument;
import org.springframework.stereotype.Service;

import java.util.ArrayList;
import java.util.List;
import java.util.Map;

/**
* @author WilsonSong
* solr的搜索服务
* @date 2018/7/25
*/
@Service
public class SearchService
{
//private static final String SOLR_URL = "http://127.0.0.1:8983/solr/#/wenda";
private static final String SOLR_URL ="http://localhost:8983/solr/wenda";
private HttpSolrClient client = new HttpSolrClient.Builder(SOLR_URL).build();
private static final String QUESTION_TITLE_FIELD = "question_title";
private static final String QUESTION_CONTENT_FIELD = "question_content";
/**
*
* @param keyword 搜索的关键词
* @param offset 翻页
* @param count 翻页
* @param hlPer 高亮的前缀
* @param hlPos 高亮的后缀
* @return
* 搜索
*/
public List<Question> searchQuestion(String keyword, int offset, int count, String hlPer, String hlPos) throws Exception
{
List<Question> questionList = new ArrayList<>();
//solr的相关配置
SolrQuery query = new SolrQuery(keyword);
query.setRows(count);
query.setStart(offset);
query.setHighlight(true); //高亮
query.setHighlightSimplePre(hlPer); //前缀
query.setHighlightSimplePost(hlPos); //后缀
query.set("hl.fl", QUESTION_CONTENT_FIELD + "," +QUESTION_TITLE_FIELD);
QueryResponse response = client.query(query);
//解析搜索的界面的东西
for (Map.Entry<String, Map<String, List<String>>> entry :response.getHighlighting().entrySet())
{
Question q = new Question();
q.setId(Integer.parseInt(entry.getKey()));
if (entry.getValue().containsKey(QUESTION_CONTENT_FIELD))
{
List<String> contentList = entry.getValue().get(QUESTION_CONTENT_FIELD);
if (contentList.size() > 0)
{
q.setContent(contentList.get(0));
}
}

if (entry.getValue().containsKey(QUESTION_TITLE_FIELD))
{
List<String> titleList = entry.getValue().get(QUESTION_TITLE_FIELD);
if (titleList.size() > 0)
{
q.setTitle(titleList.get(0));
}
}
questionList.add(q);
}
return questionList;
}
/**
* 索引
* @param qid
* @param title
* @param content
* @return
*/
public boolean indexQuestion(int qid, String title, String content) throws Exception
{
SolrInputDocument doc = new SolrInputDocument();
doc.setField("id", qid);
doc.setField(QUESTION_TITLE_FIELD, title);
doc.setField(QUESTION_CONTENT_FIELD, content);
UpdateResponse response = client.add(doc,1000);
return response != null && response.getStatus() == 0;
}
}

controller层

1
2
3
4
5
6
7
8
9
10
11
12
13
14
15
16
17
18
19
20
21
22
23
24
25
26
27
28
29
30
31
32
33
34
35
36
37
38
39
40
41
42
43
44
45
46
47
48
49
50
51
52
53
54
55
56
57
58
59
60
61
62
63
64
65
66
67
68
69
70
71
72
package com.springboot.springboot.controller;

import com.springboot.springboot.model.EntityType;
import com.springboot.springboot.model.Question;
import com.springboot.springboot.model.viewObject;
import com.springboot.springboot.service.FollowService;
import com.springboot.springboot.service.SearchService;
import com.springboot.springboot.service.questionService;
import com.springboot.springboot.service.userService;
import org.slf4j.Logger;
import org.slf4j.LoggerFactory;
import org.springframework.beans.factory.annotation.Autowired;
import org.springframework.stereotype.Controller;
import org.springframework.ui.Model;
import org.springframework.web.bind.annotation.RequestMapping;
import org.springframework.web.bind.annotation.RequestMethod;
import org.springframework.web.bind.annotation.RequestParam;

import java.util.ArrayList;
import java.util.List;

/**
* 搜索
* @author WilsonSong
* @date 2018/7/25/025
*/
@Controller
public class SearchController
{
private static final Logger logger = LoggerFactory.getLogger(SearchController.class);
@Autowired
SearchService searchService;
@Autowired
questionService qService;
@Autowired
FollowService followService;
@Autowired
userService uService;

@RequestMapping(path = {"/search"}, method = {RequestMethod.GET})
public String Search(Model model,@RequestParam("q") String keyword, @RequestParam(value = "offset",defaultValue = "0") int offset
, @RequestParam(value = "count", defaultValue = "10") int count)
{
try{
List<Question> questionList = searchService.searchQuestion(keyword,offset,count, "<strong>","</strong>");
List<viewObject> vos = new ArrayList<>();
for (Question question:questionList)
{
Question q = qService.selectQuestionById(question.getId());
viewObject vo = new viewObject();
if (question.getContent() != null)
{
q.setContent(question.getContent());
}
if (question.getTitle() != null)
{
q.setTitle(question.getTitle());
}
vo.set("question",q);
//问题关注的数量
vo.set("followCount", followService.getFollowerCount(EntityType.ENTITY_QUESTION, question.getId()));
vo.set("user", uService.getUser(q.getUserId()));
vos.add(vo);
}
model.addAttribute("vos", vos);
model.addAttribute("keyword", keyword);
}catch (Exception e){
logger.error("查询失败" + e.getMessage());
}
return "result";
}
}

这样后端的代码结合前端就写完了,实现solr的集成,然后就可以在你的网站使用solr搜索引擎来搜索

但是面临一个问题,你的slor的库是从数据库中导入的,然后每次出现新的内容,怎么能够实现实时的搜索呢?

有两种方式:

  • 使用solr的自动增量导入功能
  • 在增加内容的时候使用异步事件把内容实时添加到solr的搜索内容中,具体实现

首先在你增加内容 的时候先产生事件

1
2
3
4
//添加问题后就产生一个异步的事件,把问题增加进去,然后达到实时搜索的功能
eventProducer.fireEvent(new EventModel(EventType.ADD_QUESTION) .setActorId(question.getUserId()).setEntityId(question.getId())
.setExts("title", question.getTitle()).setExts("content",
question.getContent()));
1
2
3
4
5
6
7
8
9
10
11
12
13
14
15
16
17
18
19
20
21
22
23
24
25
26
27
28
29
30
31
32
33
34
35
36
37
38
package com.springboot.springboot.async.handler;

import com.springboot.springboot.async.EventHandler;
import com.springboot.springboot.async.EventModel;
import com.springboot.springboot.async.EventType;
import com.springboot.springboot.service.SearchService;
import org.slf4j.Logger;
import org.slf4j.LoggerFactory;
import org.springframework.beans.factory.annotation.Autowired;
import org.springframework.stereotype.Component;

import java.util.Arrays;
import java.util.List;
/**
* 异步事件实现增加问题就直接加入solr的搜索库
* @author WilsonSong
* @date 2018/7/26/026
*/
@Component
public class AddQuestionHandler implements EventHandler
{
private static final Logger logger = LoggerFactory.getLogger(AddQuestionHandler.class);
@Autowired
SearchService searchService;
@Override
public void doHander(EventModel model)
{
try{ searchService.indexQuestion(model.getEntityId(),model.getExts("title"),model.getExts("content"));
}catch (Exception e){
logger.error("增加问题索引失败");
}
}
@Override
public List<EventType> getSupportEventTypes()
{
return Arrays.asList(EventType.ADD_QUESTION);
}
}

这样就通过异步队列实时的将新增添的内容通过service的方式添加到solr的搜索库中,实现实时的搜索。

然后其余的部分,如solr的搜索的原理可以参照

https://blog.csdn.net/awj3584/article/details/16963525

https://blog.csdn.net/vtopqx/article/details/73459439